
 Selling Paid Articles
Show the rest of an article, past a certain point, only to buyers and monthly members
Sell everything past a point in the article
Insert a break partway through an article you've written, and you can show everything past that point to buyers and monthly members only. There are two ways to sell it, and you can use either one alone or both together.
- Single purchase: The reader buys just that one article
- Monthly subscription: Readers can read every paid article for as long as they stay subscribed
Sorabun never holds your money. It's deposited directly into your Stripe account. The only fee is Stripe's own. Sorabun never takes a cut of your sales.
Setup (one time only)
1. Enter your Stripe key
If you don't already have a Stripe account, create one at stripe.com (it's free; you only pay a payment-processing fee once you make a sale). To accept live payments, you'll need to complete identity verification (registering your business details) by following the instructions in the Stripe dashboard.
You'll find your secret key here:
- Open the Stripe dashboard
- Click the gear icon (Settings) in the top right → "Developers" → "API keys" (you can also find it by typing "API keys" into the search box at the top of the screen)
- In the "Standard keys" table, on the Secret key row, click "Reveal test key" or "Reveal key"
- Copy the string that starts with
sk_live_and paste it into "Secret key" under "Sorabun > Paid Articles"
Stripe has a test mode and a live mode, switched with the toggle in the top right of its dashboard. Test-mode keys start with sk_test_, live-mode keys with sk_live_. If you paste an sk_test_ key, the purchase screen appears but no real money moves (which is actually convenient if you want to practice a purchase with the test card 4242 4242 4242 4242). When you're ready to start selling, be sure to switch to sk_live_.
Note that the "publishable key," which starts with pk_, isn't used. Only paste the secret key.
2. Set up payment-completion notifications (webhook)
A webhook is how Stripe tells your WordPress site "the payment went through." Without registering one, the money will come in but the article still won't unlock.
- First, copy the notification destination shown in "Sorabun > Paid Articles" (
https://your-site/wp-json/sorabun/v1/stripe) - In the Stripe dashboard, open "Developers" → "Webhooks" (or "Event destinations")
- Click "Add destination" (add an endpoint)
- Paste the URL you copied in step 1 into "Endpoint URL"
- Under "Select events," search for and select these 4 events:
-checkout.session.completed(payment completed)
-invoice.paid(recurring monthly payment)
-customer.subscription.updated(subscription changed)
-customer.subscription.deleted(subscription canceled) - Confirm with "Add destination"
- On the detail screen for the destination you just created, find the "Signing secret," click "Reveal," and copy the string that starts with
whsec_ - Paste it into "Webhook signing secret" under "Sorabun > Paid Articles" and save
Both the webhook registration and the signing secret need to be in place before "payment completed" ever reaches WordPress. Also note that test mode and live mode need webhooks registered separately, because even if it works in test mode, live payments won't come through until you set up a live-mode webhook too.
Verify it works (recommended)
Before you start selling, it's worth running through the whole flow once.
- Set up with the test-mode key (
sk_test_) and a test-mode webhook - Make one article paid, and open it in a different, logged-out browser
- Click "Read this article" and pay with card number 4242 4242 4242 4242 (any future expiration date, any 3-digit CVC)
- Go back to the article. If the rest of it appears, it worked
- Once confirmed, swap the key and webhook for the live versions (
sk_live_and the live-mode webhook)
If you paid but the rest of the article isn't showing, open the matching destination under "Developers > Webhooks" in the Stripe dashboard. You'll find a delivery history with failure reasons. A string of 401 or 400 errors usually means the signing secret is wrong (mixing up test and live is the classic mistake); no delivery history at all usually means the URL is wrong.
3. If you're using a monthly plan
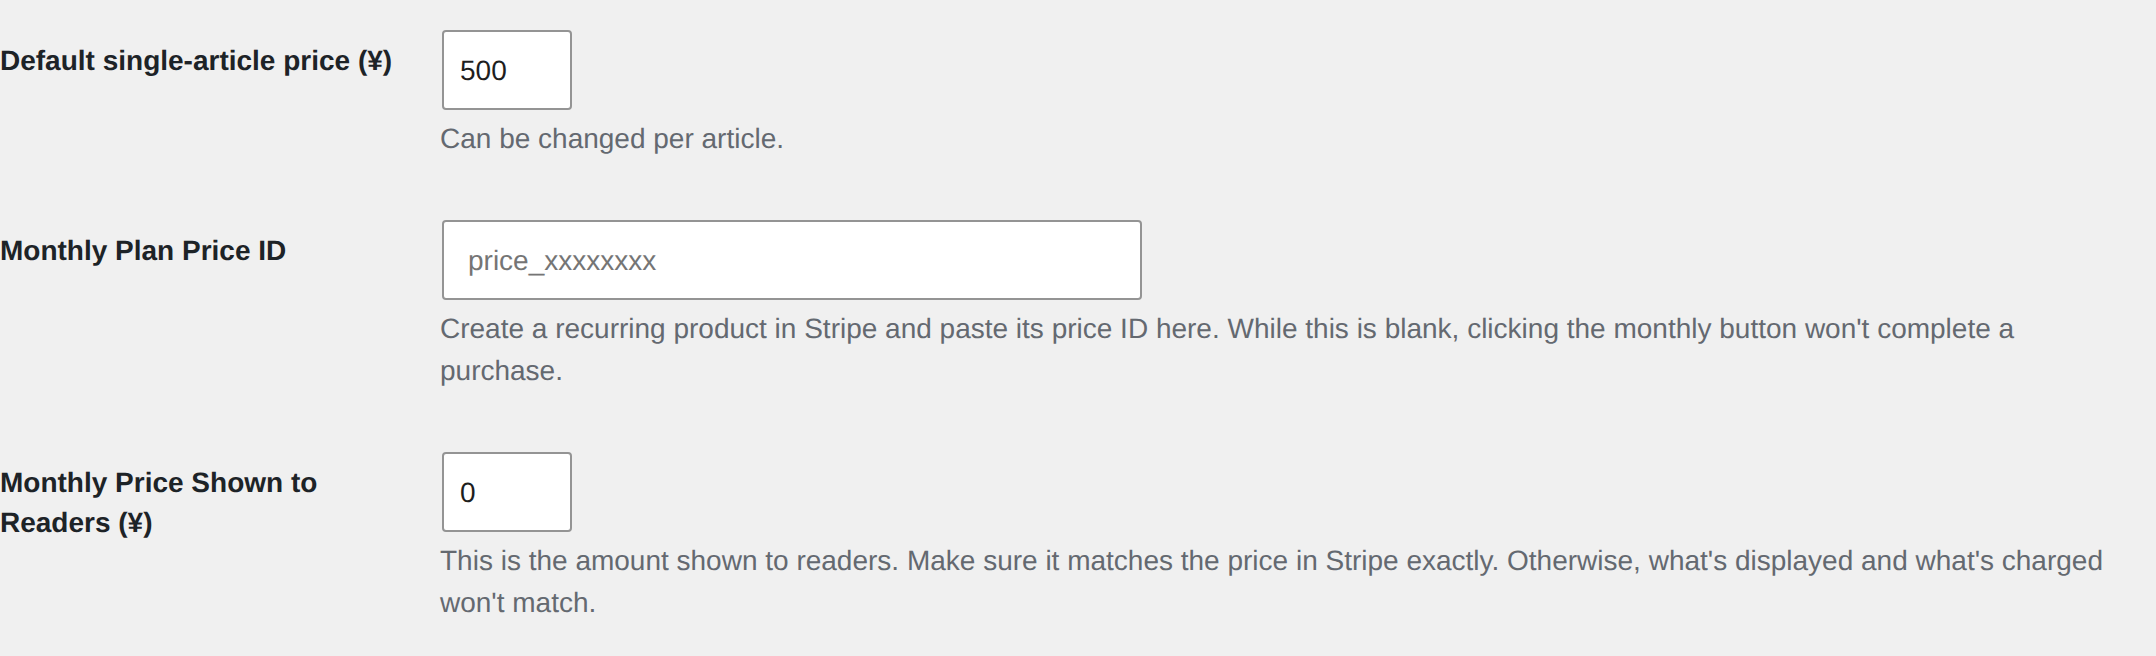
In Stripe, create a "recurring" product and enter its price ID (starts with price_) into "Monthly plan price ID." Also enter the amount to show readers into "Monthly display price." Make sure this always matches the price set on Stripe's side, because if it doesn't, what's displayed on screen and what's actually billed won't match.
4. Prepare your Act on Specified Commercial Transactions notice
If you're selling paid content, this disclosure can't be skipped under Japanese law. Create a static page listing your business name, address, contact information, payment methods, and return policy, then enter its URL into "Act on Specified Commercial Transactions notice URL." It will then be linked from the purchase screen.
5. Create a page for readers
Create a static page and put [sorabun_account] in its body. It becomes a screen listing everything the reader has purchased, where they can also cancel or change their payment method.
Making an article paid
In the "Sorabun Paid Article" panel on the right side of the article editor, set how it's sold (single purchase only / subscription only / both) and the price.
In the body text, put [sorabun_paywall] at the point where you want the paid section to begin.
If you forget to add the break, the beginning of the article automatically becomes the free portion (roughly the first 40%). Where exactly it cuts off varies by article, though, so for articles that matter, we recommend placing the break yourself.
Readers coming from search only see the free portion at first. How well the article sells depends on whether that portion makes them want to read on. A common approach is to give a small piece of the conclusion up front, then put the reasoning or steps behind the paywall.
Magazines (selling articles in a bundle)
You can bundle multiple articles together and sell them for one price. It works much like note's "magazine" feature.
- Create a magazine under "Posts > Magazines" and set a price
- Add articles to the magazine using the "Magazine" panel on the right side of the article editor
That's all it takes. A "Buy and read the '◯◯' magazine" button now appears on the paywall notice of every paid article in that magazine.
Whether an article is readable is determined by "whether it's currently in the magazine." Buyers can read articles added to the magazine even after their purchase, without paying again. This lets you sell something that grows over time, like a serial or a course.
- One article can belong to multiple magazines
- Leaving the price blank (or 0) means it isn't sold, so it just works as a plain collection
- A magazine automatically gets a listing page (table of contents)
- Changing the price later doesn't affect people who already bought it, so they can keep reading
Signaling this to search engines
Paid articles are automatically marked with Google's designated "paid content starts here" signal. Readers never see it, but without it, showing the full text to search engines while hiding it from readers can be treated as cloaking, which can hurt your rankings. No setup is needed.
Who can read it
Anyone who meets one of the following is shown everything past the break:
- Anyone who bought that article individually
- Anyone subscribed to the monthly plan
- The article's author
- Anyone with permission to edit that article (such as an administrator)
Frequently asked questions
How do I issue a refund? Refund from the Stripe dashboard. For a single-article purchase, the article stays readable even after a refund. If you need to lock it again, delete the purchase record.
What happens to purchase records if I delete an article? They remain. Records of who bought what aren't deleted along with the article, since they're needed for handling refunds and inquiries.
How do I change the monthly price? Update both the price on Stripe's side and the "Monthly display price" on this screen. Changing only one causes what's displayed to mismatch what's billed.